
Table of Contents
MERN Stack Authentication Tutorial
Welcome to the MERN Stack Authentication Tutorial 2024! In this tutorial, we’ll guide you step-by-step on how to add a secure login system to your web applications using MongoDB, Express.js, React.js, and Node.js. Whether you’re new to web development or want to boost your skills, join us in creating a strong authentication setup for your MERN stack projects. Let’s make your applications more secure and user-friendly together!
Installing 5 Packages
Initially, we have to install these 5 packages with npm or yarn
npm i express
npm i bcrypt
npm i jsonwebtoken
npm i mongoose
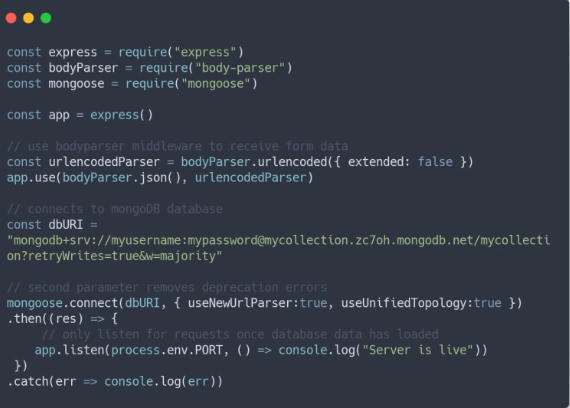
npm i body-parserIn our authentication setup, we use bcrypt to keep passwords safe in the database. JSON Web Tokens (JWTs), managed by the jsonwebtoken package, help us check if a user can access specific parts of our app. Just to clarify, authorization is about access rights, while authentication, during login, is about confirming a user’s identity. Mongoose helps us connect to our database, and body-parser makes it easy to get data from React in our requests. These tools work together to create a secure and user-friendly authentication system.
server.js
Mongoose User Schema
Now, let’s craft a model to define how each user will be organized in our database. Users are usually represented as objects with five properties: username, email, password, and the id indicating when they were created. MongoDB automatically gives us the id, but we need to guide mongoose on how the other data should appear. To do this, we use a Schema, which takes an object representing our data structure. We’ll refer to this model later when creating our register route, as each user will rely on it during the registration process.
/models/user.js
Register
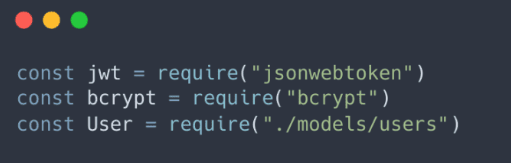
While we haven’t built the frontend for our registration system, let’s imagine we have fields for username, email, and password that send a JSON object with this data to our “/register” route. Thanks to our body-parser middleware, we can access this post data in req.body. Now, at the beginning of our server.js file, let’s require some useful modules. While JWTs will play a role in the login system, the register route requires access to the User schema and bcrypt as well. These modules will help us handle user data and ensure secure password storage.
A process for user registration using Mongoose and bcrypt in a Node.js application. This process involves checking if the username or email is already in the database, hashing the password using bcrypt, and then saving the user information to the database.
server.js

- Check if the user already exists in the database:
- Use Mongoose’s
findOnemethod on theUsermodel. - Ensure that the
findOnemethod is awaited to prevent the if statement from executing before the database check is complete.
   const existingUser = await User.findOne({ $or: [{ username: req.body.username }, { email: req.body.email }] });

   if (existingUser) {
       return res.json({ message: 'Username or email already exists' });
}- Hash the password using bcrypt:
- Use bcrypt’s
hashmethod to securely hash the user’s password. - The second parameter (salt rounds) determines the complexity of the hashing algorithm. Higher values increase security but also require more processing time.
const hashedPassword = await bcrypt.hash(req.body.password, 10); // 10 rounds- Create and save the user in the database:
- Use the information provided in the user schema to create a new user object.
- Save the user object to the database using the
savemethod.
   const newUser = new User({
       username: req.body.username,
       email: req.body.email,
       password: hashedPassword,
   });

await newUser.save();- Consistent
res.json()calls:
- Ensure consistency in the keys used in the
res.json()calls to prevent issues on the frontend.
return res.json({ message: 'User registered successfully' });This process provides a secure way to register users, check for existing usernames or emails, hash passwords, and save user information in the database. Always remember to handle errors appropriately and provide meaningful responses to the client.
Our server.js file will be much more complicated from the login system, so It is recommended to create a separate file for authentication routes and import it into your server.js file
Understanding JWTs
a.Purpose of JWTs in Authentication:
- JWTs are used to manage user authentication in web applications.
- They allow the server to generate a token representing the user’s identity upon successful login.
- This token is then sent to the frontend and can be stored securely in either
localStorageor cookies.
b.Token Generation on Login:
- When a user logs in, the server generates a JWT containing information about the user.
- This information is often referred to as “claims” and can include user ID, username, roles, and any other relevant data.
- The server signs the JWT with a secret key to ensure its integrity and authenticity.
c.Token Decoding:
- The frontend receives the JWT and stores it securely.
- Whenever the user makes subsequent requests to the server, the JWT is included in the request headers.
- The server can then decode the JWT using the secret key to verify the user’s identity.
d.Storage of JWTs:
- JWTs can be stored in either
localStorageor cookies on the client side. localStorageis a client-side storage mechanism, while cookies are sent automatically with each HTTP request.- The choice between these two options often depends on security considerations and application requirements.
e.Preserving Token Across Page Refresh:
- Storing the JWT in
localStorageor cookies ensures that the token is not lost when the user refreshes the page. - This allows the user to remain authenticated even after a page reload.
In summary, JWTs provide a secure and efficient way to manage user authentication by allowing the server to issue tokens that represent the user’s identity. These tokens are then securely stored on the client side and used to authenticate subsequent requests to protected resources.
Sign JSON Web Token / Login
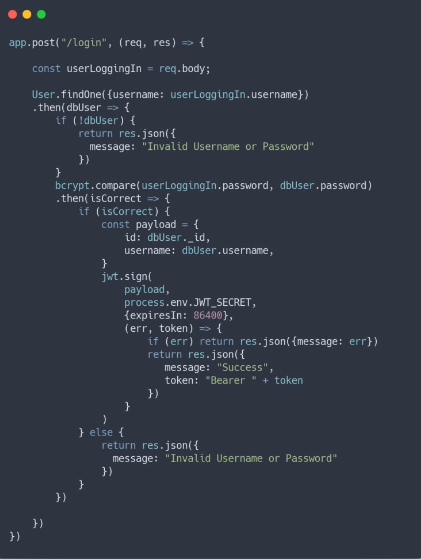
In the login post request, the process begins by extracting user information from the incoming request and searching the database for the corresponding username. Handling the returned promise with a .then, the code checks if the user exists, and if not, a response is sent indicating that the provided username or password is invalid. Upon confirming the user’s existence, the password is validated using the crypto library’s compare method. If the password is deemed valid, the flow proceeds to the generation and signing of a JSON Web Token (JWT) using the jwt.sign function. The payload of the JWT typically includes user-specific information like the username, user ID, and email. It’s emphasized to securely store the secret key used for encryption in environment variables. Additional options, such as token expiration time, can be specified in the options object. The resulting signed JWT is then sent to the frontend, prefixed with “Bearer,” following the convention for token-based authentication. Proper error handling is implemented throughout the process to address potential issues with database queries, password comparison, and JWT signing. This approach enables secure user authentication and facilitates subsequent interactions with the application’s protected resources.
Verify JSON Web Token
After successfully creating a JSON Web Token (JWT) for user sign-in, the next step involves implementing a mechanism to verify whether the user accessing a particular route is the same individual who logged in. The jsonwebtoken library conveniently provides a .verify() method to facilitate this verification process.
To achieve this, a middleware function can be crafted to handle user verification, and this middleware is placed before each route that requires protection. If the verification fails, the next() function is not invoked in the middleware, preventing the user from accessing the data associated with a specific route. Instead, an object detailing the user’s access capabilities is sent back. The isLoggedIn property is set to false if the verification fails. On the other hand, if the verification succeeds, the middleware allows progression to the route, and the response includes isLoggedIn set to true.
Additionally, when advancing to the next route, specific properties of the decoded user from the JWT can be utilized within the route call. For instance, req.user can be employed, and the decoded username and ID can be set to req.user.id and req.user.username, respectively. This allows for personalized handling of user-specific data within the protected route.
This middleware-based approach to user verification enhances the security of the application by ensuring that only authenticated users with valid JWTs can access protected routes. The decoded user information from the JWT further empowers these routes to provide customized responses based on the user’s identity and access privileges.
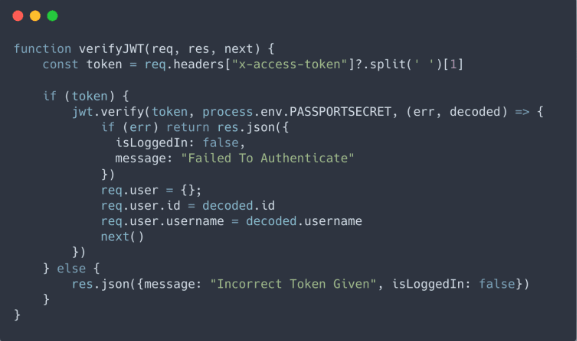
In the given code, we start by grabbing a token from the request headers. In the front end, we need to set a header called “x-access-token” and put the token there (usually from localStorage). After getting the token, we remove the “Bearer” part, leaving only the token. Then, we use jwt.verify() with the token, the secret key used before, and a callback function. The callback function gets the user data from decoding the token, and we set this user data to req.user. Now, any upcoming route can access req.user for personalized user details. If the token is missing or fails to authenticate, we send { isLoggedIn: false } back to the front end. This informs the client side to redirect the user, often handled with tools like React Router. This way, the application ensures that unauthorized users are redirected, improving overall security and user experience.
Accessing The Current User
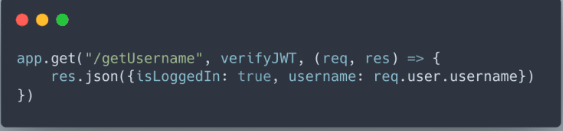
By adding the verifyJWT middleware as the second parameter in the app.get() method, we can use the current user’s data in any route we want. This middleware checks and decodes the user’s JSON Web Token, making the user information accessible through req.user. This way, we can easily handle personalized user data in specific routes, making our application more secure and customizable.
Logging Out
We can delete the token from localStorage (which can be done with a simple button click that will call localStorage.removeItem (“token”). Hence, the verifyJWT middleware will be failed and then, a response will be sent which says that isLoggedIn is set to false.
MERN Stack Authentication Tutorial (Part 2 – The Frontend)
Packages To Install
In this setup, we’ll install react-router to navigate between different routes. Each route fetches data from the server because the frontend is primarily responsible for interacting with the database. Unlike in NodeJS projects where you might use res.redirect for navigation, that approach won’t work here because the frontend and backend operate on different ports. The backend can’t directly instruct the frontend to redirect; it can only send and receive data.
Since we can’t rely on express for routing, we turn to react-router. If you’re familiar with express, you might know that engines like EJS or Pug are often used for dynamic data rendering. In our case, React serves as our view engine. However, unlike traditional view engines, we can’t directly pass data from the backend to React. Instead, we need to fetch the data from the backend within the React components. This approach allows us to dynamically display the data received from the server.
File Structure
To manage the flow of our application, we’ll create components for the login, register, and protected profile pages. These components will serve as the building blocks for our app’s user authentication system.
React Router Setup
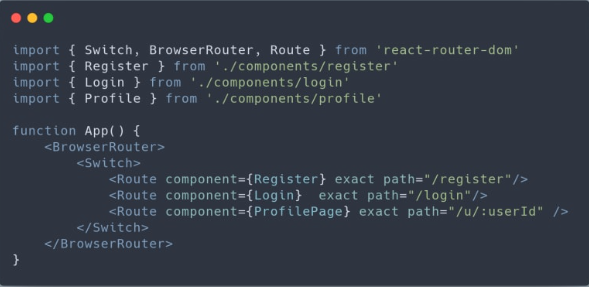
In our App.js component, we make use of three components from react-router that allow us to define route names and specify which component to render on those routes. We can even render dynamic routes by using a colon followed by a variable name, as demonstrated in the case of the Profile Page route. It’s important to include the exact attribute in each of the Route components to ensure proper routing. Without it, nested routes like “/first/second/third/page” might halt at “/”.
Fetch Requests
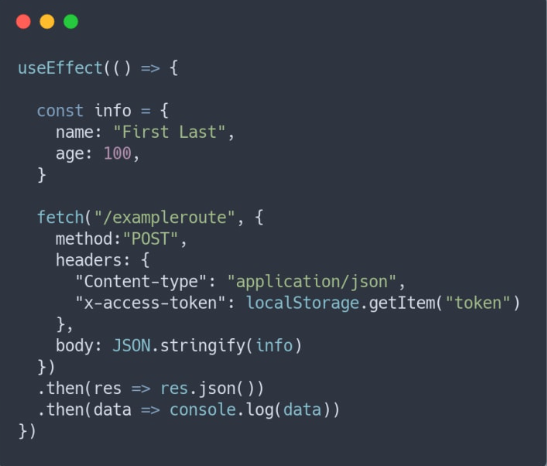
When making fetch requests in each component, it’s crucial to understand their structure and why certain elements are included. In a POST request, used to send login information to the backend, headers play a pivotal role in providing context to the recipient. Two key headers utilized are “Content-type: application/json” and “x-access-token: localStorage.getItem(‘token’).”
The “Content-type” header informs the receiver that JSON data is being sent and is required for every POST request. The second header, as mentioned earlier, is passed to routes requiring user authorization. More details on the localStorage part will be explained later, but for now, remember that this second header is employed when fetching data specific to each user.
Moreover, the fetch request doesn’t need to explicitly specify “localhost:BACKEND_PORT/exampleroute” if a proxy is set in package.json to redirect to the backend. In this case, you can simply write “/exampleroute.”
Beneath the headers, the request body must be included, consisting of the primary data to be sent. Ensure to use JSON.stringify for this body because only strings can be sent to the backend. The body parser middleware imported in the backend’s first part will parse this stringified object for further use.
Since the fetch request returns a promise, the .then method can be employed to retrieve any data sent back from the backend after processing the request. This asynchronous nature facilitates effective communication between the frontend and backend components of the application.
Login
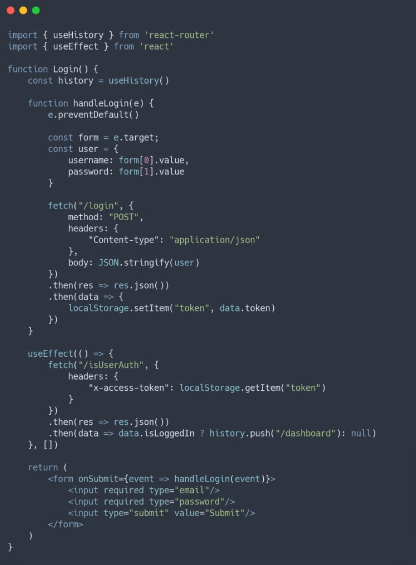
In this section of code, the form submission process is managed by retrieving input values and initiating a request to the login route. This route is responsible for validating the user, confirming their existence, and creating a JSON Web Token for the user’s session. After the request is processed, the received token is set in localStorage for persistence across page refreshes and global availability within the application. However, it’s important to note that saving tokens in localStorage has both advantages and disadvantages, which will be discussed later.
The subsequent block of code involves the useEffect hook. This code triggers a call to the ‘/isUserAuth’ route, specifically designed to verify if the user is logged in by checking the presence of the correct token. The x-access-token header is crucial for this verification. If the login fails, nothing happens. However, upon successful login, the JSON Web Token is validated, and the React Router’s history API is employed to redirect the user to the home page. Since the useEffect is executed when the component is mounted, it ensures that a logged-in user cannot access the login page as they are immediately redirected by this useEffect call.
Register
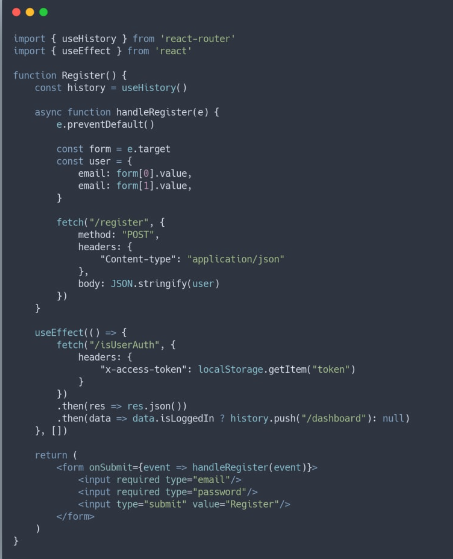
The register component is very similar to the login component. The main difference is that, in the register component, we call the register route. This route creates a new user in our database. After the user successfully fills out the form, they are automatically redirected to the login page. The form setup and how we handle it are almost the same as in the login component, making the code straightforward and easy to understand.
Data Validation
For both the register and login routes, it’s crucial to incorporate data validation to safeguard against potential issues that users might cause. It’s recommended to use an external package for this purpose, as they are generally more secure and less prone to errors compared to implementing your own solution.
Private Routes (Profile Page)
Before progressing, it’s important to note that for any private route, the ‘/isUserAuth’ route defined in the backend section of this two-part tutorial series should be invoked. This route verifies the presence of a valid JSON Web Token and, if valid, returns essential user information, such as the username. This mechanism ensures the authentication and authorization of users attempting to access private routes in the application.
Dynamically Rendering Navbar
You might wonder why I didn’t put the Navbar in the App.js component. While it would be convenient to have it there for every page, doing so would keep the Navbar the same on every page. However, the Navbar often includes buttons for login, register, or logout. It’s better to re-render these buttons dynamically when the user goes to a new page, so I choose not to make the Navbar static across the entire app.
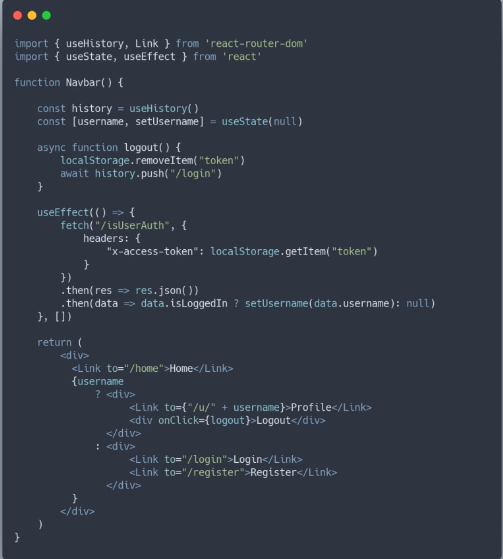
To achieve this, we start by fetching the ‘/isUserAuth’ route to confirm that the user is logged in. If they are, we can retrieve their username and display it in the Navbar if desired. Moving to the JSX part, we conditionally render the login/logout buttons based on whether the username has been set. If it’s set, we render the logout button because we know the user is logged in. Otherwise, we render the login/register buttons, both using the Link component from react-router for easy navigation to those pages. Finally, the logout button triggers a logout function. This function deletes the token from localStorage and redirects the user to the login page. This redirection is crucial for re-rendering our Navbar. Alternatively, we could achieve the same by refreshing the page after deleting the token using history.go(0).
Where to store JWTs
There are three main options for storing data in the browser: local storage, session storage, and cookies.
Local storage and session storage are simpler to implement but are susceptible to XSS (Cross-Site Scripting) attacks.
Cookies, while more secure against XSS attacks, are vulnerable to CSRF attacks. However, using an httpOnly cookie can enhance security.
FAQ- MERN Stack Authentication Tutorial 2024
Q1. How do I authenticate my MERN stack?
Ans.If the user doesn’t exist, the process continues to encrypt the password using the bcrypt module. Once the encryption is complete and the user is successfully created, a 200 status code is returned. Moving on to the login route, the system checks whether the provided user email and password match with the stored credentials.
Q2. Is there a future for MERN stack?
Ans. Choosing the MERN stack (MongoDB, Express.js, React, and Node.js) is a great decision for building modern web apps. It’s easy to learn, performs well, and is expected to stay important in the tech world for a long time.
Q3. What is two factor authentication in MERN stack?
Ans.The initial endpoint, /api/generate-2fa-secret, is designed to create and save a two-factor authentication (2FA) secret for a user. Meanwhile, the subsequent endpoint, /api/verify-otp, serves the purpose of confirming that the user can generate valid one-time passwords (OTPs) with the provided 2FA secret, typically using an authenticator app. Once successful, this process enables two-factor authentication for the user.